“We manufactured more planes and ships than Germany throughout the war,…In June, production had doubled…allowing equipment left behind in France to be largely replaced…” — Will Hutton, The Observer (2017)
We saw in Chapter 6 that in the years leading up to the war the elder Thomas brothers, Alfred and George, had had to travel far beyond the Borough limits to find work, but the start of World War II found all four brothers and their sister, Ethel, back in Oldham. As noted in Chapter 6, Ethel’s husband Charles remained in Birmingham, and although the 1939 Register shows Ethel and her young baby Charles Jr. to be in Oldham, they must, nevertheless, have joined Charles in the Midlands soon after the register was taken. Indeed, she would be present when her husband died of a brain tumour in March 1945 in Dudley Road Hospital in Birmingham. Thus the family would be divided in two, with the sisters in Birmingham and the four brothers with their mother in Oldham (George Sr. having passed away in 1930).
Since all four brothers worked in engineering, they may well have been classified as working in reserved occupations in the 1938 Schedule of Reserved Occupations, but the two younger brothers would serve in the forces. In April 1939 the government passed the Military Training Act that compelled men aged 20 and 21 to complete 6 months of military training, this would have included the youngest brother, Joe. Interestingly, the 1939 Register shows that Joe is a capstan hand (lathe operator), but that he is also a stretcher bearer in the Oldham ARP. Ultimately, Joe would serve in the Army in North Africa and Italy, and his brother Jack would join the Navy. I don’t know whether this was a matter of choice, or whether they were conscripted. It became clear to the government towards the end of 1940 that many men in reserved occupations would have to serve in the forces, and that many manufacturing jobs in munitions and engineering would have to be filled by women. My grandfather, Alfred, and his brother George remained behind working in two of the most important industries to the war effort, engineering related to shipping and aircraft manufacture.
When war was declared in 1939, the Chamberlain government had made substantial plans for rearmament; nevertheless the timetable for these plans meant that British forces would only be able to compete with the German war machine in two to three years time, far too late to save Britain from invasion (Bullock, 1967). One of the main stumbling blocks was the lack of manpower. Considering that before the war unemployment had seen nearly three million men out of work, this seems very strange. Indeed, Bullock states that this was almost like saying Britain had runout of coal! In the first year of the war conscription into the forces swallowed up over 1.7 million men, but even with over a million men still on the dole the manufacturing industries still lacked manpower. The problem was two-fold: firstly, there was a lack of skilled workers, the men and women who were available didn’t have the experience or training required for the work needed; and secondly, many of the skilled operatives were working in industries that were not vital for the war effort, and so needed to be moved to jobs that were.
A significant factor in the apparent shortage of labour was seen as the intransigence of the unions – either to envisage allowing unskilled men and women to do jobs that only skilled workers were qualified to do, or allowing skilled workers to be moved, perhaps against their will, from one job to another. Interestingly, the Government minister who would eventually solve this problem was the most powerful trade unionist in the country, Ernest Bevin the general secretary of the Transport & General Workers Union. The collapse of the Chamberlain government led to the selection of Churchill as Prime Minister in a coalition government that included the leader of the opposition, Clement Attlee, as deputy Prime Minister and, surprisingly, the appointment of Ernest Bevin to be Minister of Labour. Bevin had no parliamentary experience, but was seen to possess “…something much more important in the critical days of 1940, the temperament of a born fighter,…” (Bullock, 1967).
In addition to his obvious influence with the unions, both Churchill and Attlee viewed Bevin as a fellow patriot with the work ethic and determination to do his utmost to serve his country in its hour of need. By joining the government, Bevin could have been viewed as a traitor by unionists and workers, and lost their support; however, he seems to have impressed upon his union colleagues that he could do more for the working man by being their representative within the Cabinet, than by pleading their cause from the outside. Indeed, he saw the Ministership as an opportunity to create institutions and legislation that would benefit the working classes not just during the war, but for many years into the future. These institutions included embedding medical officers in most factories, increasing the numbers of works’ canteens, creation of factory inspectors to improve working conditions, and the introduction of collective bargaining in most major industries. Bevin’s philosophy was that if one looked after the welfare of the workers, in return they would work much harder and more efficiently in the war effort – and it worked!
Will Hutton comparing British manufacturing output with the heroism of Dunkirk during WWII (The Observer, 16th July 2017) says:
“Britain’s naval and air strength was so formidable and our military production and technological capacity in crucial areas so superior to Germany’s…It is too rarely acknowledged…[that]…the…British economy was also performing acts of heroism…We manufactured more planes and ships than Germany throughout the war…During the battle of Britain, production of Spitfires and Hurricanes consistently outstripped Germany’s production of military aircraft…The Spitfire and Hurricane – and, later, the Lancaster bomber – were more fit for purpose…and manufactured in greater volumes [than their German counterparts]…”
Aircraft manufacture
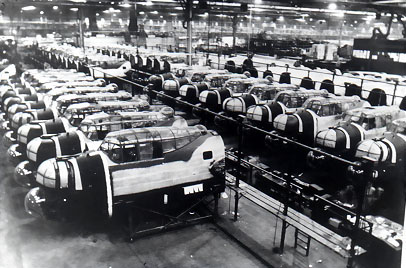
The Lancaster bomber was manufactured by the company of Alliott Verdon-Roe, A.V. Roe & Co., more commonly referred to as Avro. The company was originally based at Newton Heath in Manchester, but with war imminent, the Air Ministry provided Avro with the funds to build the largest aircraft factory in the country at Chadderton in Oldham. It was at this factory where Jack worked at the start of the war, and where many Lancasters were manufactured. The plane was built in massive sections (see picture above) and the individual sections then transported to Avro’s aerodrome at Woodford in Cheshire where they were assembled. The Chadderton-Woodford combination would produce 3,032 out of a total of 7,377 Lancasters manufactured during the war (see Avro Heritage Museum, on-line). And, as pointed out by Hutton, they were built at an incredible rate – manufacture at Chadderton/Woodford reaching 150 per month at the peak of production (Robinson, 1977). And of course, the Lancaster wasn’t the only plane produced by Avro, the Anson was another aircraft produced in Chadderton that was much used in reconnaissance and training roles. The predecessor of the Lancaster, the Manchester, was also produced at Chadderton; however the Manchester was plagued with engine problems and only 200 were built. Nevertheless when the Rolls-Royce Merlin engine became available, Avro’s designer Roy Chadwick incorporated this more powerful, and reliable, engine into his design for the “Manchester III”, which was ultimately rechristened the Lancaster (Robinson, 1977). Chadwick would also re-use some of the features of the Lancaster’s wing to create a new transporter plane, the York – Chadderton producing more than 200 of this plane, in addition to a number of Lincoln bombers and Lancastrian transporters.
By October 1941 a survey by the government would reveal that the armed forces had a shortfall of about two million military personnel (Bullock, 1967). As a result, the government would change the system of reserved occupations to ‘individual reservation’, and made more selective with District Manpower Boards given the responsibility of determining who would be called up. It was also decided that more women would have to be ‘conscripted’ into industry to replace those men from previously-defined ‘reserved occupations’ that would now have to serve in the forces. In November 1941 Jack would join the Navy, by which time his younger brother Joe was already in North Africa with the Royal Army Service Corps (RASC, see below). The elder brothers would remain on the Home Front providing vital skills in the industries that provided the planes and ships which underpinned Britain’s survival and ultimate victory. George with Buckley & Taylor who made heat exchangers for ships, and my grandfather, Alfred, working for the Fairey Aviation Company at its Errwood Park Works in Heaton Chapel, Stockport.
Fairey Aviation
Just before the war the Government instigated a Shadow Factory Scheme in which engineering factories across the country, in particular those used in motor car manufacture, were either commandeered or extended to be used in the manufacture of aircraft, so-called ‘Shadow Factories’. Amongst these shadow factories was the Willys-Overland Crossley Motors plant in Heaton Chapel, Stockport.
Crossley Motors (see previous chapter) came into existence around 1907-08 in Gorton, Manchester, but the steady growth of its business led the company to extend its car production by purchasing a 48 acre site in Heaton Chapel in 1914. Construction of the Errwood Park Works would begin in 1915, but with the ongoing war, the new factory was given over to war work rather than car building. Interestingly, the western part of the factory was taken over by the government and devoted to aircraft manufacture, becoming the ‘National Aircraft Factory No. 2’(see Grace’s Guide to British Industrial History, on-line).
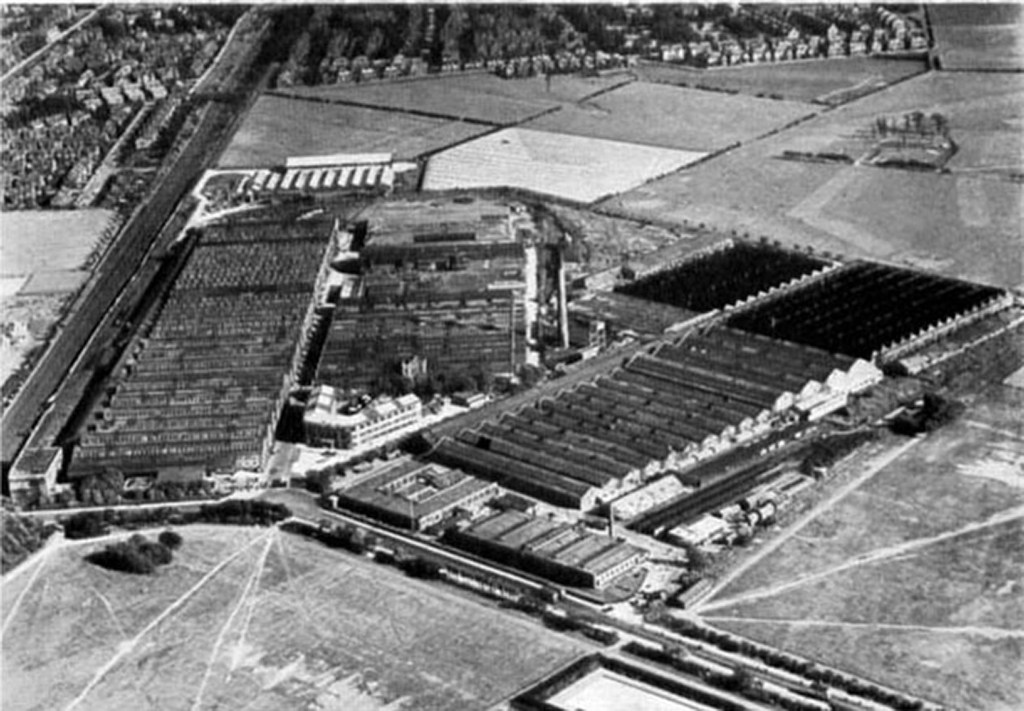
After the Great War, Crossley Motors made a deal with Willys-Overland, an American company (later most famous for making the Jeep), and bought back National Aircraft Factory No. 2 from the government to begin assembling Willys-Overland cars from kits imported from the Willys-Overland factory in Toronto, Canada. The joint company built cars, trucks and buses, with the commercial vehicles proving quite profitable, but the American designed cars never sold very well and the joint Willys-Overland Crossley company went into voluntary liquidation in 1933. In 1934-5 Crossley sold the ex-National Aircraft Factory No. 2 to the Fairey Aviation Company, with the Errwood Park Works becoming part of the government’s Shadow Factory programme that began in earnest in 1935-6.
The intention of this shadow scheme was to increase the production of aircraft by utilizing the transfer of technology from the well-established motor industry to the building of planes. One of the major factories that was created in this programme was the Castle Bromwich plant built by Lord Nuffield near Birmingham with the original intention of boosting the supply of Supermarine Spitfires. Lord Nuffield was, of course, William Morris the founder of the Morris Motor Co. in Oxford where my grandfather was working around this time. Whether my granddad heard about these Shadow Factories, and the development of the Fairey plant in Stockport while working for Morris is hard to know, but it’s certainly a possibility. Nevertheless, it’s clear Alfred must have returned north around the time that the Fairey’s Stockport branch was opened.

Fairey’s produced a number of different aircraft, including the Battle which was the first British plane to shoot down an enemy aircraft (a Messerschmitt Bf 109 on the 20th September 1939); however, this single-engined bomber was not able to compete with the fighter planes of the day, and was soon relegated to a training role (and also used to test out new engines). Over a thousand Battles were made at Stockport before it was replaced by the Fulmar in 1942. The Fulmars saw service on aircraft carriers, and about 600 were built at Heaton Chapel. Another carrier-borne aircraft manufactured by Fairey was the Swordfish torpedo plane of which the Heaton Chapel factory received 100 from its parent factory in Hayes, Middlesex for reconditioning.
The Swordfish was thought to be obsolete, but ended the war being responsible for the sinking of more Axis ships than any other aircraft. Famously, it was involved in the sinking of the Bismarck: On the 26th May 1941 two sorties of Swordfish were launched from the aircraft carrier Ark Royal, the second of these sorties scored two torpedo hits on the German ship with one causing its rudder to jam and leaving the ship helpless in the face of a concerted attack from Royal Navy destroyers, cruisers, and the battleships King George V and Rodney, ultimately leading to Bismarck’s sinking. As well as the Swordfish, the other main Fairey contribution to the Fleet Air Arm was the Barracuda, over a thousand of which were produced in Stockport.

In addition to its own planes, the Fairey factory in Stockport also built aircraft designed by other companies; in particular, Fairey produced almost 500 Bristol Beaufighter nightfighters and about 660 Handley Page Halifax bombers (see Grace’s Guide to British Industrial History, on-line; and Robinson, 1977). Just like at Avro, the larger planes were constructed in sections in the factory and then the parts transported (see picture above) to Fairey’s aerodrome at Ringway, where the planes were assembled.
One thing that I have always been curious about was how my granddad got to and from work every day. Indeed, workers’ travel to and from the factories was an important issue that troubled the Minister of Labour, Ernest Bevin. Many workers, especially in the aircraft industries were working 10-14 hour shifts, and if they also spent a significant amount of time travelling Bevin felt this would have a detrimental effect on workers energy and concentration. I can’t help but feel that this issue was something that greatly affected my grandfather. Although he had owned a car, I don’t think that he did at this time. The driving test was instituted in Britain in 1934-35, but my dad told me that his father had never taken a test, and I’ve assumed that his driving days were pre-1935. When I first thought about his commute I’d assumed that he would have used public transport. The 1930s saw the introduction of buses as the main form of public transport, but A History of Manchester’s Tramways (1949) shows that the main route from Oldham to Manchester, and the onward journey from Manchester to Stockport was still served by trams until after the war. I estimated that his journey by tram (Oldham Corporation tram No. 1 or the Manchester Corporation tram No. 20) from Mumps to Piccadilly then on to Heaton Chapel (tram No. 35/35B) would have taken about 70 minutes. Clearly the journey to and from work would add almost three hours to Alfred’s working day, which already may have been a 12 hour shift. However, Anthony Nixon (via the MLFHS forum) forwarded to me a link to an entry on the BBC’s WW2 People’s War which recounted the story of how a young woman living in Crumpsall had had to travel to Metropolitan-Vickers (or Metrovicks) in Trafford Park to work during the war. According to her story, she would catch a train to Manchester at 6.30 am then be picked up by a special bus that took all the workers to Trafford Park to start work at 7.30 am. After finishing work at 7 pm, she would return home by the same route. I suspect that my grandfather would have done something similar – travelling on the train from Oldham Mumps station (just a five minute walk from home) to Manchester Victoria (a journey time of about 20-25 minutes), and taking a special bus from Victoria to the Fairey works in Heaton Chapel.
Oldham marine engineering
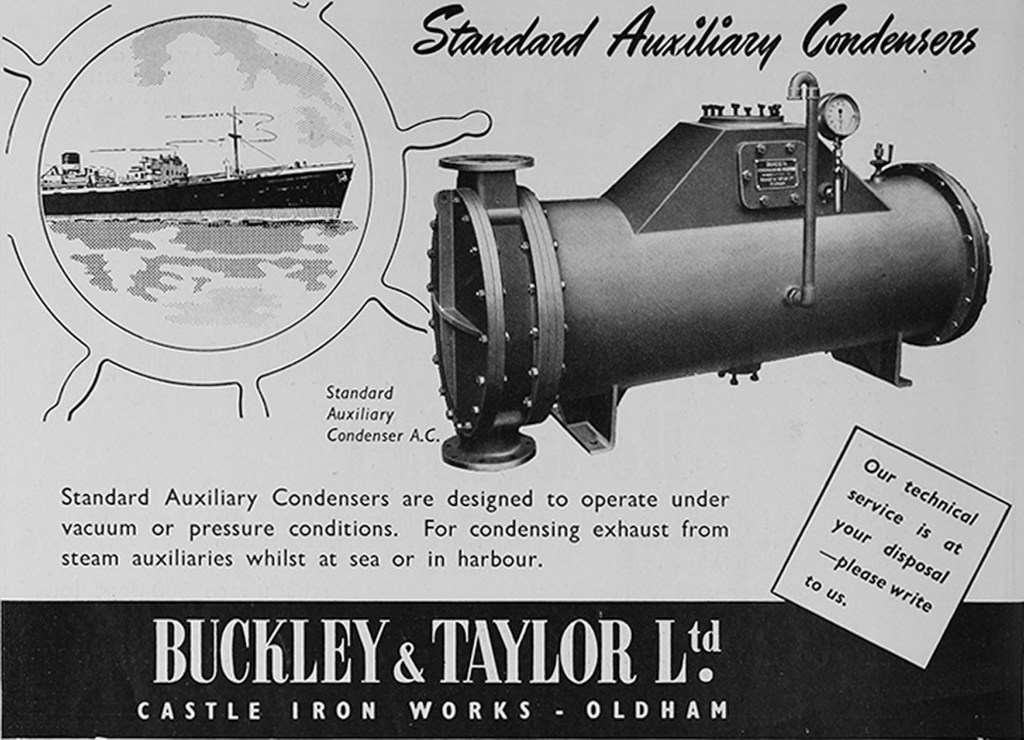
In contrast to my grandfather, his brother George would have a much shorter commute to work. Named after his father, George also followed in his father’s footsteps in his profession – an iron turner. During the war he worked for the company of Buckley & Taylor at their Castle Iron Works in Greenacres, less than a mile from his home on Roundthorn Road. The company was founded in 1861 by Samuel Buckley of Shaw and James Taylor of Lees as a maker of stationary engines that were used in cotton mills to drive the spinning and weaving machinery. However, by the early 1920s the demand from textile mills for engines was in steep decline; as a result, in the thirties the company began to diversify. A critical step in this diversification was the acquisition of the business of the Liverpool Condenser Company. They then began to manufacture auxiliary equipment for ships; in particular, the production of heat exchangers and condenser/distillation equipment. Marine condensers are used on almost all commercial ships and ships of the Royal Navy. The type shown in the advertisement below is a “shell and tube” heat exchanger (probably “two-pass”). It can be used to cool a variety of fluids; e.g., engine coolant water, oil, steam, refrigerant, etc.. Inside the shell or casing are a series of tubes through which sea-water is circulated, the steam or hot liquid to be cooled is circulated around the tubes inside the shell.
During the war Britain was heavily reliant upon shipping, not only as part of the Royal Navy, but also merchant vessels that brought supplies across the Atlantic from America and transported armaments and provisions via the Arctic convoys to Russia. However, in his biography of Ernest Bevin, Bullock states that shipbuilding and ship-repairing was one of the country’s most important war industries and that raising output was one of Bevin’s most difficult tasks considering “…the heavy rate of sinkings and damage inflicted by U-boats and air attack.”. Clearly, the demand for ships and their component parts was extremely high, and Buckley & Taylor would have been kept inordinately busy throughout the war, with George doing his bit for the nation by providing his essential engineering skills.
Despite the two younger Thomas brothers also possessing such skills, as mentioned above, both would be called up to serve in the forces – Jack in the Royal Navy and Joe in the RASC.
Jack Thomas RN, K.X.145660
Jack joined the Navy as a Stoker, 2nd Class, in November 1941 at HMS Duke a “shore” establishment in Malvern, Worcestershire. In December he was transferred to HMS Drake – the name given to Her Majesty’s Naval Base Devonport in Plymouth, Devon. After just two days he was transferred to HMS Spartiate, another shore establishment this time based in Glasgow. The headquarters of HMS Spartiate was at the St Enoch Hotel which formed the frontage of the St Enoch Railway Station in Glasgow (now demolished). However, Jack seems to have been based at Old Kilpatrick, down-river from the city and close to Dumbarton and the Firth of Clyde.

HMS Spartiate appears to be where Jack underwent his training from December 1941 to June 1942. He then spent another 11 months on the Clyde as a “Fire fighter”, being promoted to Stoker, 1st Class in November 1942. At the end of May 1943 he was transferred back to HMS Duke in Malvern. He spent a month in Malvern and another month back in Devonport (HMS Drake) before being assigned to his first real ship – the HMS Salamander – in August 1943.
The Salamander was a Halcyon Class minesweeper that was being repaired in Londonderry at the time of Jack’s assignment. Soon after he joined the ship, it would set sail for Reykjavik and would spend the next few months in anti-U-boat patrols in the North Atlantic between Iceland and the Faroes. In October Salamander would return to the UK, firstly to Scapa Flow then to South Shields on the Tyne for a refit. During the refit the crew were given two weeks leave (including Christmas and New Year). In early March of the next year the ship would be involved in minesweeping exercises around the Scottish coast before travelling south to Harwich at the end of April, then on to Portsmouth in mid-May. Much of the time spent in Scotland and around Harwich involved several other minesweepers of the Halcyon Class and was devoted to exercises that would prepare these ships for their most secret and dangerous mission – Operation Neptune, the maritime component of Operation Overlord that would be carried out on the 6th June 1944, D-Day.
“Your task will not be an easy one…I have full confidence in your courage, devotion to duty and skill in battle.” – Gen. Dwight D Eisenhower, Supreme Allied Commander.
One of the most critical aspects of the invasion of Normandy on D-Day was the task of clearing the minefields that had been laid by the Germans across the Channel. There were 12 MineSweeping Flotillas (MSFs) dedicated to the job of clearing these minefields. Each MSF consisted of eight minesweepers, two motor launches, four trawlers and a destroyer. Initially, six of the MSFs were assigned to create six 400-1200 m wide channels ahead of the invading forces to the five landing beaches, two channels to Utah, and one each to Omaha, Gold, Juno and Sword. Later, four other MSFs would sweep another four channels such that each beach would have two approach channels, one for faster moving ships (12 knots) and the other for slower vessels (5 knots).
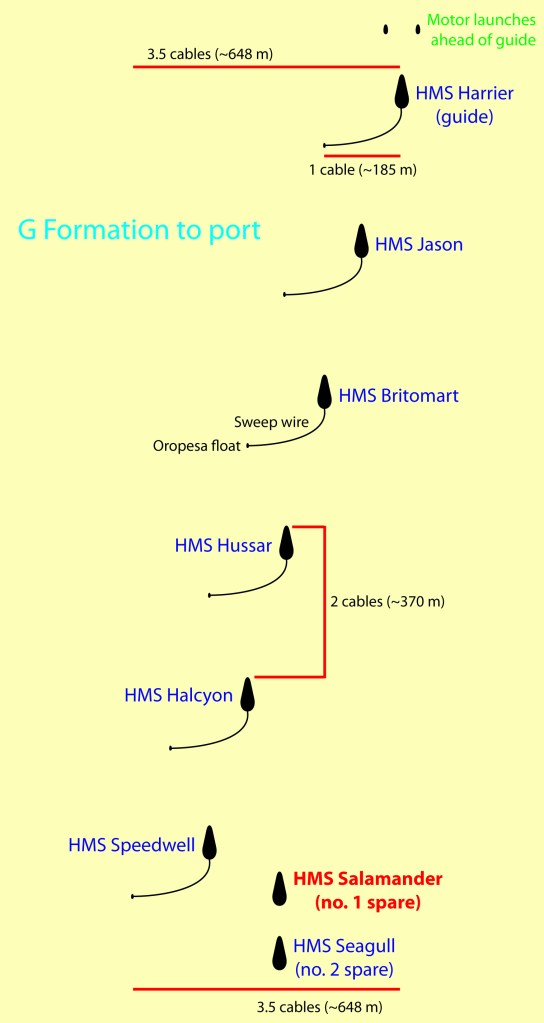
HMS Salamander would be part of the 1st MSF that would sweep the channel (designated no. 9) ahead of the landings at Sword beach, the most easterly landing site of the invasion. Each of the MSFs was to sweep the mines and at the same time mark out the safe waters with lighted “dan” buoys – a buoy made of a long pole moored to the seabed and designed to float vertically. The motor launches sailed ahead of the first sweeper (HMS Harrier in the 1st MSF) shallow sweeping and marking the deeper mines to be swept. Behind Harrier were two trawlers that acted as the “danlayers”, marking out the starboard (right) side of the swept channel. There then followed the rest of the MSF including Salamander, and finally at the rear two more trawlers that marked out the port (left) side of the swept channel and the destroyer HMS Scorpion. According to the orders (ADM 199/1629) for the 1st MSF, HMS Salamander was the first “spare” minesweeper and would have been roughly the 11th ship that crossed the channel that morning (see sweeper formation, above); however, according to the letter Jack sent to my grandparents, he was on “…the 4th ship to approach the French coast.”.
The fourth ship should have been HMS Jason; perhaps something happened during the crossing that morning that led to a change of plan? Alternatively after clearing the initial channel (according to Jack’s letter somewhat uneventful) the formation changed for the next part of the minesweepers’ task: the clearance of the mines along the French coastline to create so-called “transport” and “bombardment areas” (four to six miles long and 2 miles wide) for the anchorage of supply ships that would support the invasion after the troop landings.
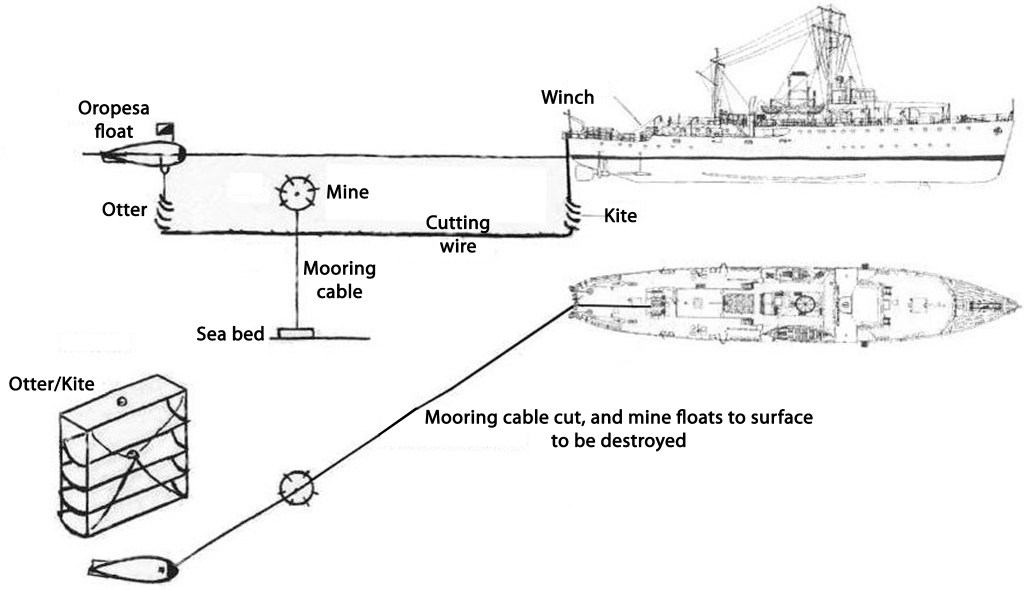
Also, shown in the illustrations above is the method used for sweeping – Oropesa sweeping in the G formation (see The Algerines). The Oropesa sweep for moored contact mines involved the use of a single, serrated wire to cut the mines’ mooring cables. The Oropesa float is attached at the outer end of the wire and the wire is held in place by the “kite” close to the ship and the “otter” below the float (see diagram, below). The G Formation refers to the position of each of the sweepers during active sweeping, essentially the ships are positioned a half cable length (300 ft or approx. 93 m) apart and two cable lengths behind one another. In the approach to the D-Day landing beaches the formation was organized to the port (left) side with the “guide” ship (HMS Harrier) being preceded by the two small, wooden-hulled motor launches that shallow-swept at the front of the MSF.
According to Jack, about five hours after the first troops had gone ashore (approx. 11.30 am) the Salamander “…ran into a stretch of water that was literally packed with mines”. Jack reported that “As we swept up the mines, so they were bursting all around us. Believe me, it was no meagre experience to be down below and hear those loud explosions which shook the ship, knowing them to be mines and thinking that if one caught the ship, we were done for. Thank God, we came through it alright.”. At the end of that historic day the Salamander would “…set sail for home, sweeping all the way and widening the channel we had already made. We were only home for a few hours though and we returned to France again sweeping. The way to England and back was like travelling along a main road. It seems hardly believable when I say that for over 100 miles there were two continual streams of traffic. One going to France and the other returning to England for further supplies. Barges and ships of all descriptions, each on the tail of the other: And so it has gone on for days.”.
The Salamander would continue sweeping operations in the Channel to widen the approach channels and transport and bombardment areas for several months after D-Day. During this time the 1st MSF experienced perhaps its most frightening and fatal attack, not from the Germans but from its own side! On the 22nd August the 1st MSF was ordered to clear a field of magnetic mines just to the north of Le Havre, off Fécamp and Cap D’Antifer. At this point, due to damage incurred by several sweepers in the previous weeks, the 1st MSF had been reduced to just four vessels – Jason (new leader), Britomart, Hussar and Salamander. After four days of sweeping, the fleet was given a day of rest (Saturday, 26th August) and returned to anchor off Arromanches where its D-Day job had begun. There then followed some confusion with the flotilla receiving orders to sweep the Arromanches/Portsmouth channel. However, the flotilla leader on the Jason, Commander Trevor Crick, and his fellow officers believed that the sweeping of the mines off Cap D’Antifer was not complete. They argued that the 1st MSF should return to complete this job because the area was needed for a heavy-bombardment force to attack the coast around Le Havre.
As a result of these protests their orders were changed, and supposedly circulated to all the forces involved, including the RAF. So, the 1st MSF returned to Le Havre. After two sweeps, the magnetic-mine sweeping gear on the Hussar broke down, leaving just three ships actively sweeping – Jason in the centre, Britomart to starboard and Salamander to port (closest to the shore) – with two trawlers (Colsay and Lord Ashfield) dan laying, and Hussar as a follow-up ship. Just as the third sweep began the Britomart came under attack from the air. Seeing the Britomart under attack, Jason opened fire with her Oerlikons, but when the planes got closer it became apparent that these were RAF Typhoons and Spitfires, not the Luftwaffe. Cmdr. Crick immediately sent a wireless signal “Am being attacked by friendly aircraft”, and fired recognition signals in an attempt to stop the attack. Salamander also fired two, coloured recognition flares and lay out a large White Ensign on the fo’c’sle to try to stop the attack but without success. Cmdr. Crick ordered the sweepers to slip their sweeping gear, to increase their speed and start to zig-zag. However this was not enough, after just five minutes Crick signalled again “Three ships hit and in danger of sinking”. Both the Britomart and Hussar took direct hits and would ultimately sink, the Salamander lost almost all of its stern and was on fire. As a trained fire-fighter it seems likely that Jack would have been pressed into service to try to put out the fire. Eventually, the fire on Salamander was extinguished, but the ship was now stopped and drifting helplessly. HMS Jason and the two trawlers led the efforts to pick up as many survivors as they could, but in the midst of these rescue operations the flotilla came under heavy bombardment from German coastal batteries. Later the flotilla was joined by RAF rescue launches and two sweepers from the 6th MSF that helped to scoop up more men from the sea. However in the meantime, Salamander was drifting dangerously close to the French coast and within easy range of the German batteries. Cmdr. Crick ordered Jason to steam fast to Salamander laying a two-mile long smoke-screen between the stricken sweeper and the shore. Jason then laid two smoke floats on the lee side of Salamander to provide cover while she took the crippled ship in tow. Jason then towed Salamander back to the safety of Arromanches. A few days later a young boy would find a tattered, six ft by three ft White Ensign on the beach at Villers-sur-Mer and keep it as a souvenir. Over 40 years later he handed over the flag to the British Ministry of Defence. Investigations by the Navy News revealed that this was the ensign of the Salamander lost during the fateful attack that day (see Halcyon Class Minesweepers).
This whole episode was covered up despite, or perhaps because of, the initial loss of 86 lives and the wounding of 124 sailors. The death toll would finally reach 117 with a 153 casualties. Later investigations revealed that the leader of RAF 266 Squadron (one of the two attacking squadrons) had asked four times for confirmation that the ships he was intending to attack were not Allied vessels. Unfortunately, the Flag Officer, British Assault Area (FOBAA; Lt. Cmdr. Robert D. Franks) had not been informed of the change in the minesweeping flotilla’s orders that had been approved by Captain Minesweeping (Capt. Lord Teynham). The officer responsible for passing signals from Captain Minesweeping to FOBAA was Cmdr. Denis N. Venables. Cmdr. Venables had apparently asked a junior officer to draft the change-of-order signal, but then had failed to notice that FOBAA had not been included in the address. On the 7th December 1944, all three officers mentioned above were Court Martialled in Rouen on a charge of “Neglect of Duty”. Both FOBAA and Captain Minesweeping were acquitted, but Cmdr. Venables was found guilty and sentenced “To be Severely Reprimanded”. Ironically, less than two months later the London Gazette would report that Cmdr. Venables had been awarded a Bar to his DSC for “…courage and skill in minesweeping operations in the approaches to Le Havre”. In contrast any awards to the men of the 1st MSF were initially ruled out due to the perceived embarrassment to the Royal Navy. However, the Second Sea Lord (Vice Admiral Sir Algernon Willis) was outraged at this suggestion and, ultimately, Cmdr. Crick would be made an Officer of the Military Order of the British Empire (OBE). In addition, a further six officers and four ratings were put forward for awards, and one officer and five ratings recommended for “Mention in Despatches”. Of these recommendations, four officers were made Members of the Military Order of the British Empire (MBE), another officer and two ratings were Mentioned in Despatches, but strangely missing from these awards was Lt. Cmdr. Harold King, senior officer of HMS Salamander. However on the 26th December 1944, it was announced in the London Gazette that Lt. Cmdr. King had been awarded the Distinguished Service Cross (DSC) for “…gallantry, skill, determination and undaunted devotion to duty during the landing of Allied Forces on the coast of Normandy”.
(Note for more information regarding the friendly-fire incident described above see “Minesweepers – Friendly-fire incident” in Resources.)
Jack would remain with the Salamander until the end of January 1945; although, the ship was beyond repair and was placed in Reserve, finally being scrapped in May 1947. In February 1945, Jack would spend a short spell on another minesweeper, HMS Rothesay of the Bangor class, and a few days on HMS Anson, a battleship that was undergoing a refit in Devonport at the time. The rest of his service would be in shore establishments in Devonport (HMS Drake) and Poole (HMS Turtle) until his discharge to Class A on the 9th May 1946. For his service, he was awarded the 1939-45 Star, the Atlantic Star, the Defence Medal and the War Medal. For Operation Neptune, he was also awarded a special “France and Germany” clasp that would have been attached to the ribbon of the Atlantic Star.
In praise of the MSFs: “The work you do is hard and dangerous. You rarely get and never seek publicity…No work has been more vital than yours; no work has been better done. The Ports were kept open and Britain breathed. The Nation is once again proud of you.” – Winston S Churchill.
Joe Thomas, RASC, T/156117
As mentioned previously, the youngest Thomas brother was just 20 yr. old when the Military Training Act was enacted (May 1939), and so would have had to spend 6 months in compulsory military training. On completion of the training, recruits were required to join the Territorial Army (TA), and Joe’s service record shows that he signed up with the TA on the 1st February 1940, just a few weeks before his 21st birthday. He seems to have been initially assigned to 184 Company Royal Army Service Corps (RASC), but the next month transferred to 536 Company of the 54 Divisional Transport Column [DTC] (RASC) based in Sudbury, Suffolk. He would stay there for the next 9 months.
The RASC was the branch of the British Army that was responsible for transport and supply. This would mean supplying food, ammunition, fuel, etc. to various locations including the front lines. As well as transporting such supplies, the RASC also had the task of transporting equipment and personnel, the latter including both soldiers to the front line and wounded to medical units and hospitals.
On posting to 536 Company Joe was described as a “Private”. However, during those 9 months he seems to have been taught to drive a variety of vehicles because on his next posting he is described as a “Driver” and, as far as I know, he never had a driving licence before the war. Subsequently, he had temporary postings to 2 Holding Battalion (Barrhead, Southend-on-Sea, Essex) and 2 Motor Ambulance Company [MAC] (Chesham, Bucks). Following this last posting he was allowed seven days leave, before embarking for Egypt on the 19th March 1941 with the Middle East Forces (MEF).
(Note: For information about the various RASC companies that Joe served in see the WWII War diaries detailed in Resources.)
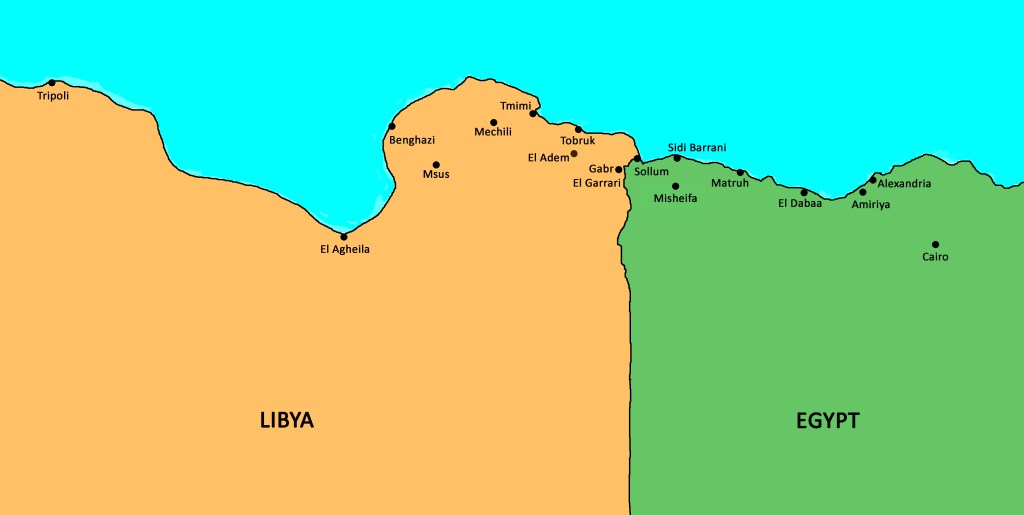
The war had spread to North Africa on the entry of Italy into the war, and its invasion of Egypt from Libya in September 1940. In response, the British launched Operation Compass in December which forced the Italian Army back into Libya destroying most of the Italian 10th Army. Over two months the British forces pushed along the Libyan coast as far as El Agheila (or Al Uquaylah; note: see map toward the end of this section for various locations mentioned in the text) capturing several port cities, including Benghazi and Tobruk. However, Mussolini requested assistance from the Germans and in February Lieutenant-General Erwin Rommel and his Afrikakorps arrived in Libya with orders to defend the province of Tripolitania. The Allies believed they had plenty of time to rearm and refuel before Rommel’s forces would be ready to mount a counter-offensive. However, they hadn’t accounted for the boldness of the German General. It became apparent that the British forces had over-extended themselves, the Axis forces began their counter-attack in March and quickly pushed the Allies back to the Egyptian border, leaving just Tobruk as an Allied stronghold – the siege of Tobruk started on the 10th April 1941 and lasted 241 days until the port was finally relieved at the end of November.
Joe arrived in North Africa on the 8th May 1941 just before the second attempt by the British to relieve Tobruk (Operation Battleaxe, 15–17 June). On the 12th June, Joe was “Taken On Strength” (T.O.S.) with 1 Petrol Depot [PD] & Base Depot. One PD had been involved in the retreat from Greece and had arrived at Port Said (Egypt) from Crete on the 31st May. The depot then moved to the Mobilisation Control Centre at Camp El Tahag just northeast of Cairo. Three days after Joe joined the depot it received orders to move to Amiriya (or Al Amiriyah), just southwest of Alexandria. As might be expected from its name, 1 PD was actively involved in storage and distribution of fuels – Automotive Gas Oil (A.G.O.), Motor Transport (M.T.) spirit, Aviation spirit, and Petrol Oil Lubricants (P.O.L.).
On the 8th July the store was attacked by enemy aircraft and a bomb landed close to the depot, but no casualties or damage was incurred. As a result, an aerial reconnaissance of the dump was carried out on the 4th August to examine whether the site could be better disguised. The report of the reconnaissance officer includes the statement that “My first impression…was of regularity and orderliness of all permanent works in the P.O.L. district…and any camouflage already attempted was completely useless.”. Whether this report led to a relocation of the depot is not clear, the war diary shows that the unit remained in Amiriya at least until the end of August; however, Joe’s record states that for his next posting in October (to 286 General Transport [GT] Company) he was T.O.S. from Matruh (or Marsa Matruh). Perhaps 1 PD had moved further west from Amiriya to Matruh in preparation for the Allies next attempt to push the Axis forces back into Libya and to relieve Tobruk – Operation Crusader (18th Nov-30th Dec).
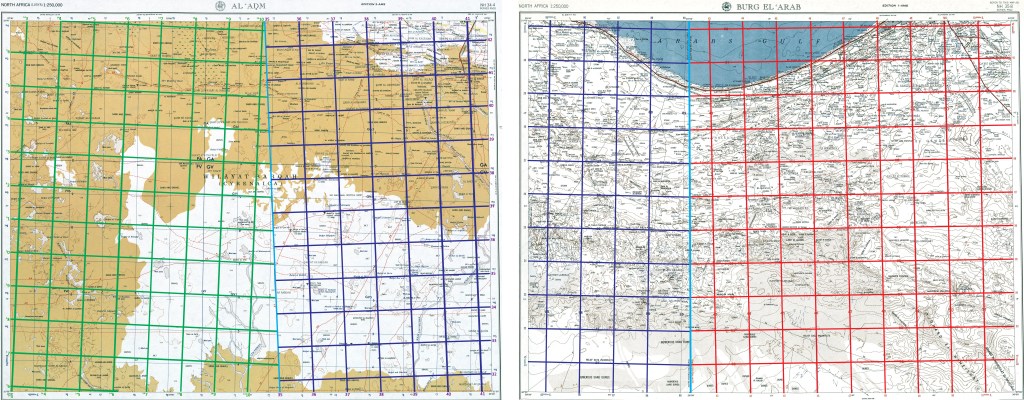
Following the failure of Operation Battleaxe, General Wavell was replaced by General Auchinleck, and XIII Corps was joined by XXX Corps with the joint force being named the Eighth Army. After this increase in strength of the Western Desert Force, Operation Crusader was successful in relieving Tobruk, and the Eighth Army forced the Axis forces back to El Agheila by the middle of December. In January Joe was with 286 GT Company in El Adem (or Al Adm) just south of Tobruk. The war diary gives the location of the Company as “purple grid reference 405 406”; examination of U.S. Army maps of the time period (available at the University of Texas) reveals this location to be just a little southwest of El Adem. The “purple grid” referred to in the diary covers a series of maps of the western half of Egypt, running from about 23.5°[E] (in Libya) to longitude 29°[E]. The other half of Egypt, east from longitude 29°[E] to the border was covered by the “red grid”, and the western part of Libya was covered by another grid referred to as the “Libyan Zone” grid (see two example maps, below).
At the beginning of January 1942, the diary of 286 GT Company shows several convoys picking up petrol from the “docks” (Tobruk?) and from 115 PD, and making deliveries of P.O.L. and munitions to various locations including Msus (or Zawiyat Masus), Agedabia (or Ajdabiya), Tmimi (or Al Tamimi), Derna (101 Forward Maintenance Company [FMC]), and the 57 and 53 FMCs at Mechili. However the success of Operation Crusader was very short-lived. On the 27th January, the diary records that two hours after delivery of 23,000 gallons of petrol to Msus, the consignment had to be destroyed “…in view of the proximity of the enemy”. Similarly, during the convoy’s return to El Adem, a 10 ton truck had to be abandoned on the Mechili-Charruba track and “…all vital parts were removed before it was left”. Five days later, the diary reports a heavy air raid on the aerodrome at El Adem and “…some machine gunning in the vicinity of the camp but no damage or casualties”. On the same date it was reported that XIII Corps had been forced back to a location 10 miles east of Tmimi. The next day (2nd Feb) the diary states that both 127 and 258 Companies had been withdrawn and “…this unit remains the only unit operating 10 ton vehicles forward of Tobruk”. In the following weeks fighting seemed to be getting closer to the camp – on the 7th enemy planes were driven off by Anti-Aircraft fire and Allied fighter planes, and on the 9th a Hurricane was shot down close by, the pilot being killed. On the 10th 4 Platoon was reassigned to XXX Corps Headquarters and 3 Platoon to Officer Commanding (OC) RASC 86 Sub Area for duty at the “railhead”. Three days later the rest of the unit was evacuated eastward to Sidi Barrani. The unit arrived at the new location just a little to the east of Sidi Barrani on the road to Matruh (ref. 604 378; purple grid) on the 15th February. In the following weeks the unit was involved in numerous transport convoys moving materiel mainly from Matruh (19 Detail Issue Depot [DID] and 202 PD) to Tobruk, Sollum (or Salum), and 80 Field Supply Depot (FSD). On the 22nd February 3 Platoon was again assigned to duties at the “Desert railhead” in Sub Area 86 – at Misheifa aka Bir Abu Misheifa (or Abou El Mushayfah Well). However, the following day the diary reports that this platoon was attacked by Messerschmitt 109s about 17 miles south of Sidi Barrani on the Bir Emba track. Two 10-ton trucks were destroyed, two men were killed and eight wounded (one seriously).
On the 17th March 1942 the unit would be on the move again, this time to just south of Bir Thalata aka Bir El Thalatha (or El Thalatha Well; ref. 586 324; purple grid), which is south of Sidi Barrani beyond the railhead at Misheifa. They were not there very long before yet another relocation to Gabr El Garrari at purple grid reference 500 368 (in Libya, just across the border southwest of Sollum) on the 25th March – except 2 Platoon which remained on duty at Misheifa. For the next two weeks the unit would be involved in deliveries mainly to 40 FSD at Giarabub (or Al Jaghbub) and 62 FMC, picking up supplies from the railhead at Capuzzo (Fort Capuzzo is in Libya just west of Sollum). On the 11th April the unit would relocate once more, their new site being at purple grid reference 501 382, to the west and slightly north of Sollum (barely 10 miles directly north of their previous position). The unit was still obtaining it’s supplies from Capuzzo (both the railhead and 103 PD), but now delivering mainly to Tobruk, 4 Forward Base (FB) Area at Gambut (or Kambut) and 33 DID. On the 22nd April the diary reports an accident at the railhead in which a box of German mortar bombs fell from the tailgate of a lorry and a Lieutenant R.R.K. Rennick suffered serious injuries. Sadly, the next day the diary reports that Lt. Rennick had died of his injuries. The diary also says that he was buried the same day at Capuzzo New Cemetery along with a Driver Smith who “...died from injuries received as a result of an explosion“. It’s not clear whether these two deaths were caused by the same accident. The Commonwealth War Graves Commission records that Lt. Richard Randolph Kingston Rennick (93550; age 28) is buried in plot 1.A.3. in the Halfaya Sollum War Cemetery. In the next plot (1.A.4.) lies his comrade Driver Hiram Smith (T/124118).
In another incident on a convoy to 4 FB, a vehicle hit a landmine, but there were no casualties and the vehicle was repairable. A few days later on another mission, a Driver Martin stood on a grenade and sustained injuries to his foot and abdomen. He was admitted to 62 General Hospital in Tobruk – with typical British understatement the diary relates “Efficiency as a soldier likely to be impaired”!
In May the destination of deliveries seems to change with many convoys now taking fuel and rations to 83 FMC whose location is recorded as purple grid reference 431 384, by my estimates this is Hagfet en-Nadura (or Haqfat an Nazura). During this period the Axis forces were pushing back the Allies towards the Libyan-Egyptian border, and this new location would be closer to the fighting – deeper into Libyan territory and less than 35 miles south of Tobruk which came under sustained Axis attack on the 21st May (the Battle of Gazala). Just two days later Joe would be reassigned to 127 Company situated at Capuzzo, indeed he was accompanied by 12 other Drivers and a Corporal from 286 Company. This move seems very fortunate for those reassigned because a few days later enemy flares were dropped close to the 286 Company camp, and a nearby aerodrome (Sidi Azeiz) was subjected to two nights of bombing. On the 29th the unit was warned to be ready to move “…within one hour”, and indeed the next day 286 Company received orders to move to purple grid reference 438 398 (close to Hareifet en-Nbeidat or Garaet en-Nbeidat) – even closer to the fighting! Perhaps unsurprisingly, on the way to the new location, the column came under heavy machine gunfire from enemy aircraft, and once established at the new site the unit was subjected to another aerial attack that lasted 30 minutes. At the same time, any loaded trucks were ordered to proceed to purple grid reference 412 393 (just south of Haqfat Nuzhat) to unload – perhaps the front line?
Although further behind the lines, 127 Company suffered intermittent air raids and considerable bombing. As a result, the unit received orders “…to prepare for all-round defence…[and] be ready to leave at short notice”. The main job of the unit seems to have been to deliver M.T. spirit and munitions to 4 FB, and to return with “salvage”. On the 31st May 127 Company received orders to move to a new location; however, the next day these orders were rescinded and the unit ordered to wait. There then seems to have been a great deal of confusion as to where the new location would be, and where deliveries were to be made. Ultimately, the Company moved to purple grid location 426 406 on the 2nd June, but three days later it was back in Capuzzo! The next few weeks the unit appears to have been a hive of activity, even receiving reinforcements from 258 Company (including 30x 10-ton vehicles). The deliveries to 4 FB and 501 Advance Ammunition Depot (AAD) were almost entirely munitions with return loads consisting of salvage. During this period the Battle of Gazala for control of Tobruk was ongoing. In mid-June there was a switch to delivery of “supplies”, EFI Stores (Expeditionary Force Institute; overseas version of the Navy, Army and Air Force Institute [NAAFI]), RE Stores (Royal Engineers?), petrol and P.O.L. in “Local Detail” to Sollum, Sidi Barrani and Misheifa. Then on the 18th June the Company would move west to purple grid reference 513 357 – about 11 miles south of Sollum and 9 miles east of the Libyan border. However, again their stay was just a few days before they were on the move, this time in what might reflect a general retreat of the Allied forces. On the day that Tobruk fell to the Axis forces (21st June) the Company moved east to Daba (or El Dabaa), further east again on the 28th to Burg-el-Arab (or Borg El Arab). On the 30th the Company was taken under command of XXX Corps, and divided into two components: All available “load carriers” were to stay in this “forward” location with a skeleton HQ, and the main HQ with workshops would move east on the 1st July to Mena Camp (just west of Giza/Cairo). As a driver, I would imagine that Joe would remain in the forward position carrying on the Company’s transport responsibilities. Ultimately the Allied forces would be pushed back into Egypt as far as El Alamein where they would dig in and solidify their defences.
As the 127 Company was arriving at Mena camp, the First Battle of El Alamein was just beginning. In the next 10 days the Company’s workshop would spend a great deal of time repairing vehicles to be sent to the front line. On the 11th July 1942 the Company would be reassembled as a single unit at a new “forward” position: red grid reference 463 888 (between Bir Abu Bakr and Bir el Hagg Raslan, a little southwest of Burg-el-Arab) under 4th Line of Communication Transport Column. On the 19th the Company would again split into two, the main HQ and transport vehicles moving north back to Burg-el-Arab under 2nd Line of Communication Transport Column and XIII Corps with the job of keeping 86 FMC supplied with P.O.L., and the workshops moving to Amiriya where main repairs would take place. On the 22nd the Company was placed “…under three hours notice to move forward”; however 127 would remain in Burg-el-Arab for the next month with very little activity. Indeed, on the 3rd August the diary notes that “In view of inactivity, application made for leave as some men…have not had leave since February ‘41”. However, two days later the workshops would arrive from Amiriya, and the next day the whole company was put on alert of an impending air-borne attack. Ten days later there was a practice to move to “Defence Positions” in case of an attack; however, a few days later the unit received orders to move back to Base Area (Amiriya), it’s position being taken over by 244 company.
After arriving back in Amiriya further moves were made to allow leave to Alexandria for many of the men. However, the company was now under 1st Line of Communication Transport Column (and the Eighth Army) and was obliged to undergo a period of intense training. The diary entries seem to reflect some resentment toward these training requirements, and eventually the Commanding Officer (Major Cozens) is able to set up a “rest camp” in Sidi Bishr (northern area of Alexandria; referred to in the diary as “Stirling” Rest Camp), and arrangements were made for each man to get six days leave there. After a period of inactivity, between the 17th September and 5th October the company seemed to enter a very busy period delivering numerous loads of Ammo, Supplies and P.O.L. to the “Forward Area”. Then on the 6th October 1942 – just two weeks before the 2nd Battle of El Alamein – the company would move to red grid reference 448 904 (by my estimates this is close to Abu Shineina, a few miles to the east of El Alamein). On the 15th the Stirling Rest Camp would close, and the company continued to deliver P.O.L. and ammunition to Forward Areas until the 20th when it was moved back to Amiriya (referred to in the diary as Kingi Maryut or Iking Maryut), carrying out “Local Details”.
Three days after the move back to Amiriya the 2nd Battle of El Alamein would begin and the company would come under 6th Line of Communication Transport Column (RASC) and the Eighth Army still carrying out Local Details. However, on the 3rd November the diary makes note of an impending “striking force” given the code name “Grapeshot”. The force involved 120 10-ton vehicles from 127 Company together with another 47 from 286 Company “night” loaded with “RAF P.O.L., Ammunition, M.T. spirits, Octane, etc.”. Nevertheless, the mission was ultimately cancelled, and on the 7th the company would move to the area of El Alamein under 2nd Line of Communication Transport Column, then on the 11th to El Dabaa, to Matruh on the 14th, and then back to Capuzzo on the 21st November. These sudden, rapid movements presumably following the advances of the Allied forces following the victory at El Alamein. Indeed the Company would spend only a week in Capuzzo before moving forward again to Tobruk on the 29th, and yet again in mid-December to Benghazi. For the rest of the month the company seems to have been employed in picking up loads of P.O.L. from Tobruk and transporting it to Benghazi. The diary reports that on Christmas day the fare was “issue” pork supplemented with “pork, poultry and Christmas pudding purchased from the NAAFI.”; there was also a “free issue of beer and cigarettes made from PRI [President of the Regimental Institute] funds”.
The following month Joe would be transferred once again, this time to the 61 Detail Issue Depot (DID) which at the time was located just west of Sirte (34 km east of Buerat) providing a Field Supply and Petrol Depot (FSD and FPD) for 111 FMC. However on 22nd January 1943, just three days after Joe joined 61 DID, the depot was on the move; firstly, to Beni Ulid (or Bani Waled) then to G. Garabaulli (or Gasr Garabulli, aka Castelverde) just east of Tripoli. Clearly, the Allied forces were on the move westward, rapidly pushing the Axis forces back through Libya towards Tunisia. Indeed on the 15th February, 61 DID would cross the border into Tunisia and set up its depot in Ben Gardane. A month later 61 DID was ordered forward once again to set up 117 FMC, first to Medenine (30th March), then to Gabes (31st), and finally to Thyna (13th April) to set up 118 FMC. The depot would move temporarily to the Army roadhead at Sfax (22nd), but then further west to Le Krib (or Al Karib) on the 3rd May. On the 26th May the depot would receive orders to move back to Sfax, and then to proceed east to Tripoli; however, on arrival at Sfax the orders were changed and the unit wouldn’t proceed to Tripoli until the 15th July. On arrival the 61 DID came under the 15th Line of Communication Transport Column, and received orders to “…re-organise as Type B DID and re-equip to scale.”
The rest of the month appears to involve a series of recruitments, promotions and appointments to various positions in the DID. Finally, in the second week of August 1943 the unit received orders to report to the Deputy Assistant Director of Supplies (DADS) X Corps, and on the 8th moved to “new site”. The diary doesn’t stipulate a location, but refers to the site as “Field”; however, entry on the 16th refers to issuing materiel for “landing purposes” and rations issued “for voyage”. The invasion of Sicily had begun with Operation Husky on the 9th July leading to the surrender of Mussolini on the 25th July 1943, and the complete evacuation of Axis forces from the island by the 17th August. It would appear that 61 DID was employed at one of the embarkation points supplying the troops with provisions for their imminent transport to Sicily and subsequent preparation for the invasion of Italy which would begin on the 3rd September. The job of the unit seems to have been to provide food rations to 56 Division and X Corps. (Note: 56 ‘London’ Infantry Division moved from Libya to Italy landing in Salerno on the 9th September.) On the 23rd September all operations were shut down, the depot “cleared of all supplies”, and the unit moved to kilometre 13 on the Tripoli-Zuara (or Zuwara) Road. There the men commenced “training programmes” in readiness for embarkation to Italy. On the 3rd October, the unit arrived at Malahari quay in the port of Tripoli and embarked the next day for Italy on HMS LST-426 (a tank-landing ship) with “4 vehicles, 3 Officers, 39 O.R.’s and 10 tons of stores”. They spent two days at sea before landing at Salerno Bay on the morning of the 7th October 1943.
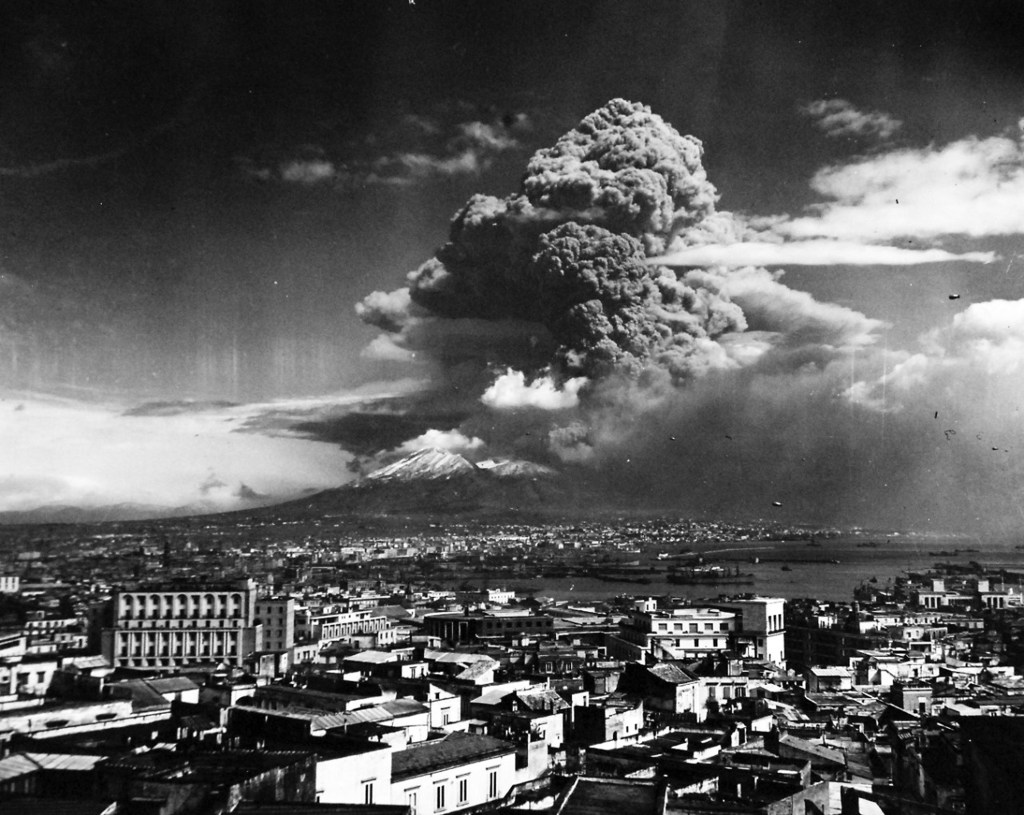
The unit was billeted at Salerno for a few days before receiving orders to proceed to Naples. The depot arrived in eastern Naples (San Giovanni) on the 14th, and began to issue provisions to the Army and RAF in “57 Area”, taking over the duties of 23 Base Supply Department (BSD) which moved to Torre Annunziata. On the 19th and 21st the depot was subjected to enemy air raids, but no casualties were sustained. Likewise in early November there were several more air raids, but with no damage to the depot. For the next few months little of note is recorded in the war diary; however, there appears to have been a break-in on the night of the 26th January 1944 in which 38 sacks of flour were stolen. The next night there was another attempted break-in that was thwarted by the guards, but the burglars escaped. Two days later a search was carried out in a neighbouring block of flats which uncovered a quantity of American supplies and Italian Army equipment, but it doesn’t seem as though the flour was ever recovered. The next entry of note was on the 18th March 1944, the diary reports “Increased volcanic activity on VESUVIUS”. This seems to be something of an understatement (see image below). There was a considerable eruption around this time, mainly confined within the rim until the 18th when lava overflowed and continued for several days engulfing and destroying several villages. Eventually, on the 24th, there was an explosive eruption and the nearby airfield of the U.S. Army Air Force 340th Bombardment Group sustained heavy damage including the loss of about 80 B-25 Mitchell bombers.
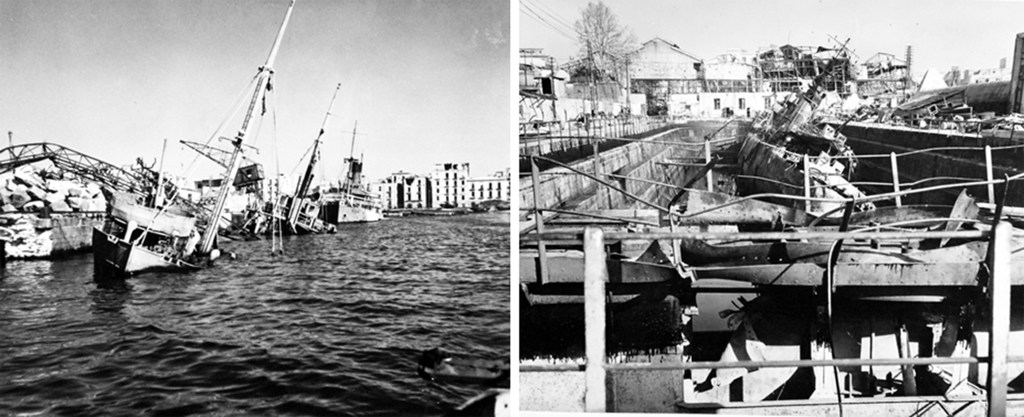
Until Joe’s transfer to 350 GT Company (Central Mediterranean Force; CMF) on the 14th September, there is little of interest reported in the war diary other than occasional air raids and shortages of supplies or staff. When Joe joined 350 Company it was based in Naples at the Prince of Piedmont Artillery Barracks under Line of Command 25th Transport Column. In the early part of 1944 before he joined the company there is much mention in the diary of “dock clearance”. This probably refers to the large amount of work that needed to be done to make the docks usable for shipping-in and distributing provisions. Naples had been heavily bombed by the Allies before the invasion, and the Germans had carried out a huge amount of sabotage before retreating – blowing up buildings and bridges, tearing up railway tracks, as well as sinking ships in the harbour (see images below).
Otherwise, the company war diary gives little detail of what functions it was carrying on – many days just mention “Routine Details”. The summary for September states that 10x ten-ton trucks are in the south of Italy (Crotone) working with the Royal Engineers, 16x ten-ton trucks are working in the Florence area with the Signals, 14x ten-ton trucks working for 23 BSD, and another 54x ten-ton trucks working day and night in the docks. In addition there were “two civilian platoons of 3-ton vehicles” involved in local details and dock clearance. With regards 10-ton vehicles, the estimated mileage was 142,000 with, on average, 95 vehicles available for daytime work and 25 for night work. In general the diary states that “health discipline and morale remain good”. The following month vehicle details are similar with general comments stating that “Health in general has been good, with skin diseases slightly more than normal. Practically no V.D.”! By December, only one platoon is still on detachment (Crotone), three platoons in Naples, 59 ten-ton vehicles in use during the day, 43 at night, loads moved from the docks amounted to 47,786 tons, and mileage was 111,252 (excluding platoon on detachment).
On the 5th January 1945, Joe would be admitted to 92 General Hospital (Naples); unfortunately, I don’t know why. He would remain in hospital until 12th February when he was transferred to the X(ii) List, then to the X(iv) List on the 3rd March, and TOS back to 350 Company on the 15th April (for explanation of the various military “Lists” see table below). In the meantime, the 350th would carry on much as it had for the previous twelve months – “Routine dock details”. In the six months to June, the company would average about 190,000 miles using 68 ten-ton trucks during the day and 55 at night to transport over 48,000 tons of materiel each month. On the 7th May the diary records “Reports of surrender on Western Front…”, and on the 8th “Surrender officially announced.”. On the 9th there was a “Theatre holiday” involving football matches and a treasure hunt. Routine details carried on for the next month until the “advance party” of the company (C & D Platoons) received orders to move north to Milan on the 9th June. This advance party travelled via Rome, Foligno, and Bologna (via Fano), arriving at Via Codogno in Milan on the 13th June. On the 16th C & D Companies moved to Rho in northern Milan and set up workshops in the Campo Sportivo. The rest of 350 Company would depart from Naples on the 21st June reaching Lake Trasimeno (Perugia) on the 22nd, Florence on the 23rd, Bologna on the 24th, and rejoining C & D Companies in Rho on the 25th. The diary ends here with the setting up of Company HQ at Rho on the 25th June 1945. On the 26th Joe would be SOS to the X-List, then on the 14th July arrive back home in England (Python) to be SOS the CMF and TOS “B” Company 1 Holding Battalion RASC. Investigations on the WW2Talk forum have revealed that B Company was stationed at Oulton Park Camp near Tarporley in Cheshire in December of 1945 – assuming the company hadn’t moved in the previous five months, Joe would have been just 40 miles from home when he first returned to the UK. However, this would not be his last posting. In September he was transferred to 588 Company RASC (CMF), then in November to 4 Depot Company at the RASC Mobilisation Centre (Cardiff), and later the same month to “C” Company 3 Holding Battalion.

At the beginning of the following year (January 1946) Joe was assigned to 230 Company (Cmd. Tpt.) in Guernsey. Two thirty Company RASC was part of “Force 135” that was formed in order to liberate the Channel Islands from Nazi occupation (Operation Nestegg). The liberation of the islands began after the surrender of the Germans on 8-9th May 1945, so by January 1946 230 Company must have been involved in general clearing-up operations, moving supplies and other materiel around the islands and providing transport, both military and civilian (including a ferries between Guernsey, Alderney and Sark).
Two thirty Company began leaving the Channel islands on the 19th May 1946, but Joe was posted to the Y List on the 10th May, so he must have left Guernsey before the rest of his unit. The records of the withdrawal of Army personnel from the Channel islands show that 10 men of “Age & Service” Group 29 sailed from the islands between the 19th and 24th May, with men from later groups (30-32) sailing at later dates. The group number was based on the year of birth and the date of enlistment for the war (see table, below). Joe was born in 1919 and started his service in February 1940, as such he was classified in Age & Service Group 28 which may explain his earlier release. In accordance with his length of service (six years and 99 days) he was given “Release leave” of 56 days (until 5th July). He also spent four years and 127 days overseas which entitled him to further “O/S” [Overseas] leave of 52 days (until 26th August) – so continuing to receive Army pay for about three and a half months after finishing his service. Following the O/S leave he was released to the Z list (Army Reserve). Joe was awarded the War Medal 1939/45, the 1939/45 Star, the Africa Star with 8th Army Clasp, the Italy Star and the Defence Medal. In addition, he would leave service with a “Certificate of passing of test of competence to drive” (Road Traffic Acts, 1930 to 1934), and would finally be discharged from the Reserve list on the 30th June 1959.

The two sisters
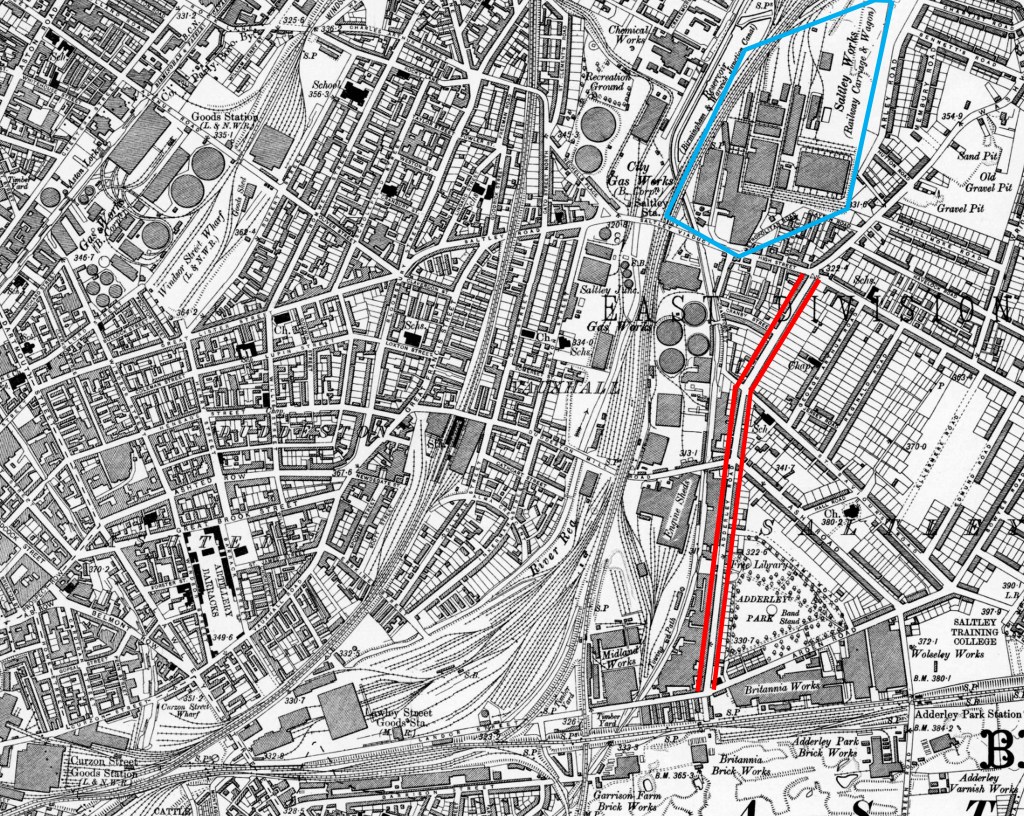
Before ending this chapter I mustn’t forget the two Thomas sisters, Annie and Ethel. Annie and her husband Tom Shaw together with Ethel’s husband Charles Bailey had moved to Birmingham in the thirties to find work. The 1939 Register revealed that the Shaws and Charles Bailey were sharing a home in the Saltley district of Birmingham on Adderley Road. Both men were employed as “Steel wagon erectors/fitters”. In the map below, Adderley Road can be found just south of the “Saltley Works (Railway Carriage & Wagon)”. This was originally the site of the Joseph Wright’s Metropolitan coach-building company that built railway carriages. Also shown on the map, to the southern end of Adderley Road, are the Midland Works and the Britannia Works each of which was also a works for railway carriage manufacture, originally occupied by the Midland Railway Carriage & Wagon Co. Ltd. and Brown, Marshalls & Co. Ltd., respectively. At the turn of the 19th century Brown, Marshalls & Co. Ltd. together with Metropolitan and three other companies were incorporated into a single company the Metropolitan Amalgamated Railway Carriage and Wagon Company. Later in 1919 the amalgamated company was acquired by Vickers Ltd., and ten years later Vickers merged its railway rolling stock business with that of the Cammell Laird & Co. Ltd. (who by this time had acquired the Midland), to create the Metropolitan-Cammell Carriage & Wagon Co. Ltd., commonly known as Metro-Cammell. The Saltley Works mentioned above would be the home of this newly-amalgamated company, and the most likely place of work for Tom Shaw and Charles Bailey.
During the war this company would devote much of its attention to building tanks; in particular the Valentine. At the time of World War II British tanks could be divided into three categories: Light (for reconnaissance), Cruiser (fast and well-armed), and Infantry (heavy and slow). The design of the Valentine was proposed just before the war without any designation, but was essentially a Cruiser-type with heavier protection (60 mm thick); effectively falling between two categories – heavier and slower than a Cruiser, but lighter and faster than an Infantry tank. Vickers had already designed and built Cruiser-type tanks (the Cruiser I and A.10 Cruiser II), and proposed to build the Valentine by modifying these Cruisers, and in so doing, using many of the same components. This plan meant that Vickers could mass-produce the Valentine very quickly, something that was vital considering the major loss of heavy equipment that had occurred as a result of the evacuation from Dunkirk. Almost 7,000 Valentines were built in the UK, with Vickers-Armstrong (Tyneside) producing about 2,500, about 2,200 were manufactured by the Birmingham Railway Carriage & Wagon Co. Ltd. (nr. Smethwick), with a similar number being built by Metro-Cammell. The Valentine proved dependable and easy to maintain, and its low profile made it easy to conceal and hard to hit (The Online Tank Museum). The tank saw much action in North Africa and the Middle-East, but was gradually superseded by superior tanks as the war wore on, very few being used as front-line tanks in Europe following the D-Day landings. Perhaps, their greatest contribution to the war effort was in Russia – almost 4,000 units (including about 1,400 Canadian-built) being shipped to the Soviet Union under lend-lease.
At the start of the war Charles Bailey was the same age as his brother-in-law, George Thomas, and like George would not serve in the forces; perhaps due to his reserved occupation. Tom Shaw on the other hand was probably too old to have been called up – 43 years old in 1939. However, he had already served in the Great War, signing up in 1915 at just 19 years of age.
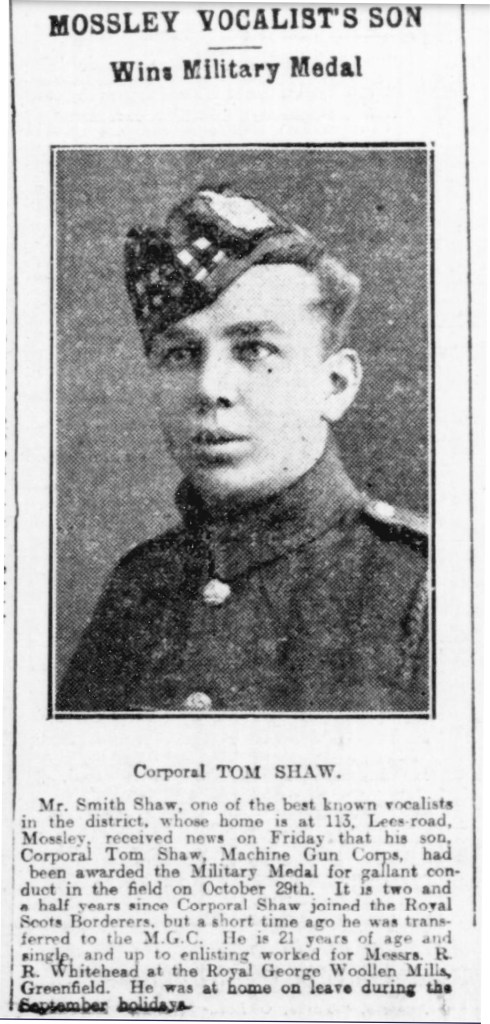
Tom Shaw, KOSB (20423) & MGC (6768)
He had joined up with the King’s Own Scottish Borderers (KSOB) and had been selected to serve in the Regiment’s machine gun unit. However, in October 1915 the military administration decided to take all the machine gun units from the various Regiments and amalgamate them all into one unit – the Machine Gun Corps (MGC). Around January 1916 Tom was sent on an intensive six-week gunnery course at Belton park near Grantham in Lincolnshire. He would have signed up as a Private, but ended the war as a Corporal. There is no evidence from the company war diaries that he was made up in the field, so I suspect he was made a Corporal based on his performance in the training programme. On completing the course, he was posted to number 104 Company of 104 Brigade which joined the 35th Division of the British Army at the end of April 1916 at Lestrem in Northern France (Pas-de-Calais).
The 35th Division was soon deployed further south around Bazentin (Somme). Tom’s company would then be heavily involved in the Battle of the Somme, taking part in fighting at Arrow Head Copse, Maltz Horn Farm and Falfemont Farm leading eventually to the capture of Guillemont in early September. During the period from mid July to the end of August the British and French forces advanced just over four miles, with the final push to capture Falfemont Farm and Guillemont covering a further two and a half miles. In the process, the British used 32 divisions incurring 250,000 casualties, and losing 126,000 men.
In September the 35th Division was transferred north to the Arras sector, apparently to rest after its service on the front line on the Somme. Through the next three months the Division was involved in defence against German raids and mortaring – the latter requiring tireless work in repairing the trench system in worsening weather conditions as winter approached. In early December the division was relieved by the 9th division and moved to the east of Arras, and then in February to the Caix sector east of Amiens. At this time the division came under heavy bombardment as the Germans created defensive cover for its imminent move back to the Hindenburg line – a retreat of about 25 miles that occurred in mid March 1917; an advance for the Allies that was greater than they had achieved in the previous two and a half years!
From the retreat of the Germans in March to the middle of May the division was given the task of patrolling an approximately four kilometre section of the Hindenburg line just to the north and west of Saint Quentin around Fresnoy-le-Petit. Towards the end of May the divisional HQ was stationed at Péronne with the 104th Brigade being posted further north along the Hindenburg line to Villers-Guislain. They remained there consolidating trenches until July when the division was moved just south and east of Épehy. Through July, August and September there followed numerous forward and backward skirmishes resulting in little gains for either side, but with a significant loss of men – as a result the 35th Division was reinforced with 234 officers and men from the Glasgow Yeomanry.
On the 3rd October the division was relieved by the 55th Division, and the infantry brigades were moved west of Arras for a period of rest, refitting and retraining. Around the middle of the month the 104th Brigade was posted to the northern part of the Ypres Salient opposite the Houthulst Forest to take part in the Third Battle of Ypres. In a prelude to the Second Battle of Passchendaele, the 104th would take part in an attack on the German line around Houthulst Forest on the 22nd October. The action took place over waterlogged terrain and gained very little territory at a cost of many lives. Between the 18th and 29th October, the 35th Division lost 368 men killed, 1734 wounded and 462 missing. It would be for his bravery during this action that Tom Shaw would be awarded the Military Medal – awarded for “acts of gallantry and devotion to duty under fire”. Just four days later the Second Battle of Passchendaele would begin in earnest – the climax of the Third Battle of Ypres. Over the next few months (Nov 1917-Feb 1918) the infantry brigades would spend some time resting around Poperinge or on the front line at Poelkapelle. In February there was a reorganization of the 35th Division, part of which involved 104 Company becoming “A” Company of the 35th Battalion MGC.
The first engagement of A Company was in the First Battle of Bapaume, in effect a British defensive operation in response to the German Spring Offensive – Operation Michael. This battle was one of a number of rearguard actions fought by the Allies as the Germans advanced over 50 km from the Hindenburg line around St Quentin to the outskirts of Amiens. The intention of the German General Ludendorff was to push through the British lines to reach the coastal ports cutting off Allied supply lines and trapping the British in Flanders. When the 35th Battalion arrived just north-west of Péronne on the 24th March, the Germans had already gained around 25 km. Tom’s company set up 12 gun positions just east of Maricourt, but the very next day received orders to retreat to Bray. Over the next ten days they would make further withdrawals, until on the 4th April they were able to hold the line just north east of Corbie from Vaux sur Somme across the river south to Bois de Vaire. Ultimately, the Allies would foil Ludendorff’s plan by managing to hold Amiens in the Battles of Avre and Ancre (4th-5th April). In his report to the Secretary of State for War on the 23rd December 1916, General Sir Douglas Haig would say “Machine guns play a great part – almost a decisive part under some conditions – in modern war, and our Machine Gun Corps has attained to considerable proficiency in their use,…The highest value of these weapons is displayed in the defensive rather than in the offensive…”. One must assume that the 35th Battalion MGC played a crucial role in the defence of Amiens, and ultimately in thwarting Operation Michael.
Over the next few months the battalion would be involved in numerous counter-attacks and skirmishes around Aveluy Wood before being transferred north to St Omer (Ypres) on the 30th June. On the 2nd July A Company would be moved across the border into Belgium, to the front line at Watou. Two days later the whole battalion was posted further south to the Loker Sector in relief of the French 71st Division. The four companies (A, B, C & D) of the battalion spent the next three months alternating at the front line or in training in preparation for the Fifth Battle of Ypres (the Advance in Flanders). During the Advance in Flanders, the 35th Division, as part of the 2nd Army, would contribute to a force under the command of the King of the Belgians. On the 28th September the 35th Division attacked the enemy positions on a line from just north of Ypres (Comines Canal) south to Mont Sorrel (Hill 62). The division broke through and advanced firstly to Zandvoorde, then Ten-Brielen (29th) and on to Wervik. After a failed attack on Wervik (30th), A Company was withdrawn until the 5th October when it joined 106 Brigade in an assault near Terhand. It was at Terhand Crossroads that the company suffered heavy casualties (four dead and 19 wounded). Nevertheless, the 35th made steady progress over the next two weeks reaching Courtrai (Kortrijk) around the 19th and crossing the River Lys (Leie) near Bissegem, advancing on to Avelgem by the 26th. On the 1st and 2nd November all companies were taken into billets in Courtrai and spent the next week in training. On the 10th the Germans suddenly evacuated the high ground on the east side of the River L’Escaut (Scheldt) at Avelgem, and the battalion crossed unopposed setting up HQ in Kluisbergen. The next day was, of course, Armistice day with the war ending at 11 am. At this time the battalion companies had been separated, but on the 14th the unit would be consolidated at Sulsique (Zulzeke).
The battalion would spend the next few months in northern France before returning to England in April 1919. Along with his Military Medal, the silver British War and bronze Allied Victory medals, Tom would be awarded the Croix de Guerre by Albert I, King of the Belgians. I can find no reports of how he earned this honour, however the award was one of several “exchange” awards between the various Allied forces that would have come about following recommendations by the battalion Commanding Officers. Perhaps the award was related to something that happened during the final advance of the Allied forces in Flanders (Terhand Crossroads?) when his company had been under the command of Albert I? Another mystery is that, in this citation, he is referred to as Sergeant Thomas Shaw – the Medal Rolls only refer to him as a Corporal, and he was born Tom, not Thomas; however, the citation also quotes his MGC service number, 6768, which is correct. Discussion with his grandson, Robert Austin, suggest that he may have re-enlisted after the war with a Scottish regiment. It’s possible that his promotion to sergeant occurred in this regiment after being demobilzed from the MGC and prior to the award of the Croix de Guerre in September 1919.
(Note: For information regarding 104 Company and the 35th Battalion MGC see the WWI War diaries detailed in Resources.)
Unfortunately, Tom would not live long after the end of the Second World War, dying at just 49 years of age in April 1946. He would leave his wife Annie, with their 15 year old daughter Lena, the princely sum of £193 9s 2d. A year later, Annie would remarry to Albert Edward Roberts. Like Tom, Albert was a coach builder, perhaps working for the same company as Tom and maybe Annie had met him through her first husband? On their marriage certificate it says that she was working as a “Stores Assistant”; so, another possibility is that Annie got a job with the same coach builder after Tom’s death and met Albert at work.
As mentioned above, when war broke out, Ethel was still in Oldham while her husband had moved to Birmingham. When she arrived in Birmingham is not clear; however, she would be in the city when her husband died of a brain tumour less than two months before Victory in Europe (VE) day. On his death certificate, Charles is described as an “Engineer’s driller”, presumably still at the Saltley Works. The couple’s address is now on Coleshill Terrace, just off the High Street, my interpretation being that when Ethel and Charles Jr. arrived in Birmingham, Charles Sr. moved out of the accommodation he shared with his in-laws, the Shaws, to a more suitable home for his small family. Just three years later, when she remarried, Ethel is still living in Coleshill Terrace and is working as a “Weaver [?] (Motor Parts)”. One possible place of employment lies at the southern end of the map shown above, the Wolseley Works by this time owned by Morris Motors Ltd.. In 1949, on the birth of their son, Ethel’s second husband, William Hill, is described as a “Wood machinist, Carriage and Wagon Works”. This description would suggest that William may have worked at the Saltley Works, and may have met Ethel through her first husband, or one of her brothers-in-law (Tom Shaw and Albert Roberts), all of whom may have worked at the same location.
On her marriage to William, Ethel’s son Charles would be nearly 17 years old. She would gain two more children, a 10-year old son and an eight-year old daughter from William’s first marriage, and less than a year later would give birth to the boy mentioned above. In the same year that Ethel married William, her brother Joe would also be married – the youngest and last of the Thomas family to wed. His wife, Esme (née Gilmour), would give birth to a daughter just a year after their marriage. In all, the six, surviving children of George Vinge Thomas would have fourteen offspring, of which two would died in infancy. I will finish my narrative here, leaving just the mystery of George Vinge Thomas to be resolved in my Epilogue.
